

In this article, I’m going to cover how to create a WordPress document library, protected behind a member wall, that includes a high-performance faceted search feature. Of the plugins listed, only the plugin FacetWP has a licensing fee. The free versions of the remaining plugins work great for this purpose.
Plugins Used:
- Custom Post Type UI
- Ultimate Member
- FacetWP ($100/year)
- JetPack (restricted to a specific feature)
Here is what will result:
- A custom post type will be created called Research.
- Each Research post will contain a PDF file link which is the research paper.
- The body content of each Research post needs to be very short, because that content will be listed on the Research listing page instead of the post excerpt.
- Visitors must have an account to access the Research content.
- Accounts are created manually. In this use case, there is no self-signup for an account since it is by invitation only. You could certainly change that for your situation.
- Searching the library will be accomplished via “Faceted Search”, in which several different controls provide a means to filter the library records beyond just a text search.
- This method will restrict faceted search just to the Research custom post type.
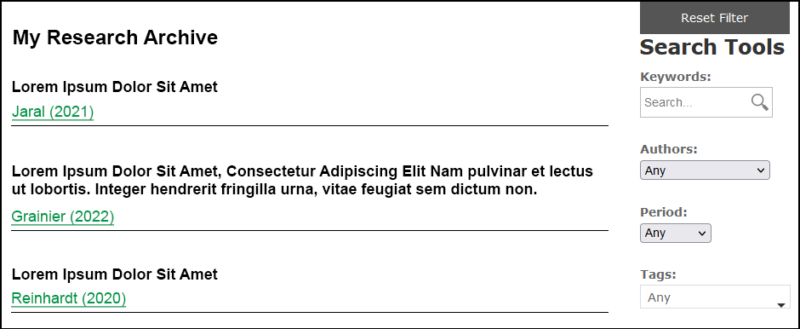
Here is a screenshot of what we’ll end up with:
Step 1: Custom Post Type UI
There are several plugins available for creating and managing custom post types in WordPress, but I’m going to use Custom Post Type UI by WebDevStudios. Once it’s installed, it’s time to configure it. When finished, there will be a new menu option called Research in your Admin dashboard:
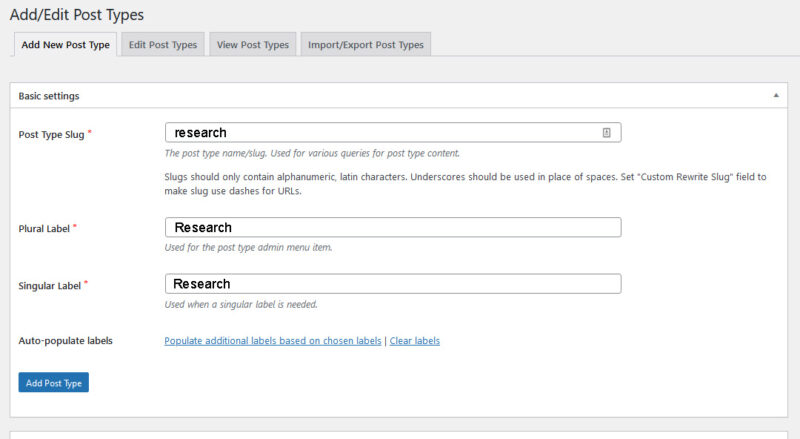
- From the Admin Dashboard, select CPT UI…Add/Edit Post Types.
- Fill out the fields so they look like the screenshot below.
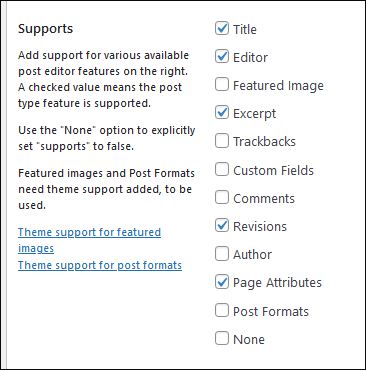
- Now scroll down until you’re almost at the bottom, until you see a section called Supports. Set it as shown in this graphic. These items will show up as features your custom post type supports. For instance, in a traditional WordPress Post, you always have access to revisions. But unless you check the Revisions checkbox, your custom post type won’t support revisions.
- Click on the blue button Add Post Type at the bottom of the screen.
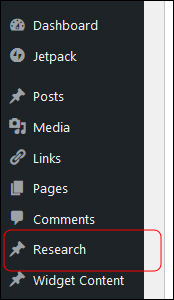
- You should see a new menu item, Research, in your Admin dashboard.
- Now we’re going to add some taxonomies. Taxonomies are ways to group your Research posts that go beyond typical WordPress categories and tags (though those are also considered taxonomies). In this use case, each Research post needs a field for populating Authors, the paper’s Period (year of publication), and Research Tags.
- From the Admin Dashboard menu, select CPT UI…Add/Edit Taxonomies.
- Fill out the fields as shown in the graphic below, minding the capitalization. You can ignore all other fields on this screen.
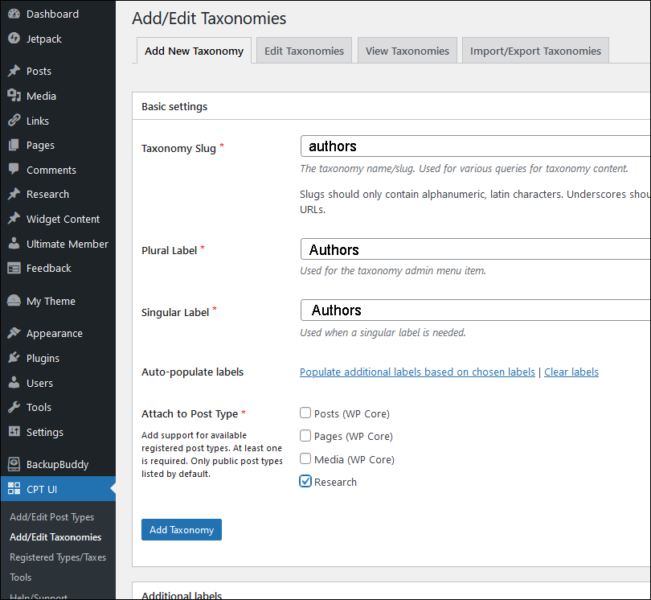
Make sure to select the checkbox Research.
- Click the blue button Add Taxonomy.
- Add the taxonomies Period and Research Tags in the same manner. For Research Tags, write it as either researchtags or research_tags. How you write this will determine the resulting slug. According to the Custom Post Types UI plugin, “Slugs should only contain alphanumeric, Latin characters. Underscores should be used in place of spaces.“
- Let’s return to our custom post type and add these taxonomies to it. From the Admin dashboard menu, select CPT UI…Add/Edit Post Types.
- From the tabs on the page, select Edit Post Types.
- Your Research post type appears. Scroll down to the end of the screen and you’ll see the Taxonomies section. Check Authors, Period, and Research Tags.
- Click the blue button Save Post Type.
Step 2: Ultimate Member
Visit Plugin Page
There are many membership plugins available, but this plugin works well with FacetWP, which we’ll cover farther down.
- From the Admin dashboard menu, select Ultimate Member…Settings.
- On the resulting page, select Access.
- Scroll to the bottom where you’ll find the option “Enable Content Restriction settings for post types” as shown in the graphic below. Check Page and Research. This does not apply any actual restrictions. It makes the option available on pages and on Research custom post types.

Add Some Research Posts
- From the Admin dashboard menu, select Research…Add New. This is similar to filling out a traditional WordPress blog post or page. On the right side you’ll see you can add to your three taxonomies of Authors, Period, and Research Tags.
- Skipping to the bottom of this page, you’ll also see a section for content restriction (this is coming from the Ultimate Member plugin), and a checkbox for restricting this post. Check this box for every Research post you create. Place the PDF link (the research paper, or whatever your situation demands) at the beginning of the post body.
- When we build the page that will list the Research posts (the front end of our Research library, as it were), it’s going to list each post with its title and then the full body of the post. This is because each post contains a PDF file as its first piece of content, and we want that PDF to show up in the listing as clickable. If we use the post excerpt, we don’t get the link because WordPress strips it out. Sure, the member could click to open the post and then click on the PDF link, but the method described negates the need for anyone to open the post. They can scroll through the listings until they see the post and PDF of interest.
Step 3: FacetWP
FacetWP provides the faceted search experience that works well with this use case. Here’s a screenshot of faceted search interface we’re going to create. The button Reset Filter is actually a little extra code we’ll insert to refresh the page, which has the effect of resetting the results and the filters. The filters are technically known as facets.
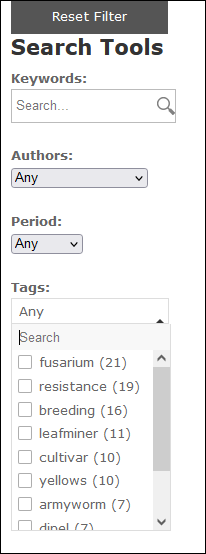
You’ll notice that our taxonomies are found here too; Authors, Period, and Tags (Research Tags). FacetWP lets you present these taxonomies as facets that filter results.
As you define a facet in the next steps, you’ll see options for selecting the facet type, such as a search box, dropdown menu, and more.
After you install FacetWP, you can access it from the Admin dashboard menu in Settings…FacetWP.
Configuring FacetWP
- From the Admin dashboard menu select Settings…FacetWP.
- The resulting page has four tabs: Facets, Listings, Settings, Support. Let’s start with the Facets tab, which is loaded by default.
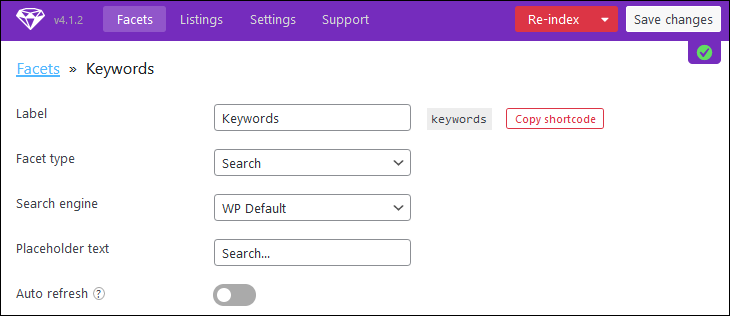
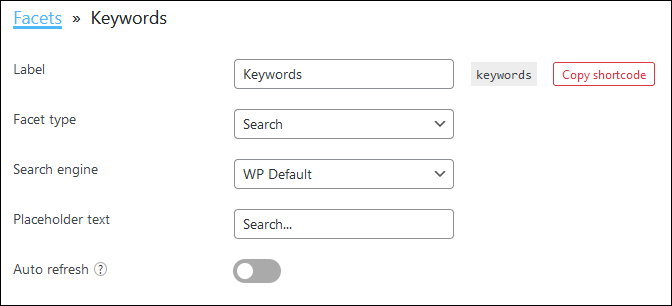
- This will be the first of five facets we will create. We’ll start with a standard Search box. Click on the red button Add new.
- Configure your facet as shown in the image below.
- When finished, click the button Save changes.
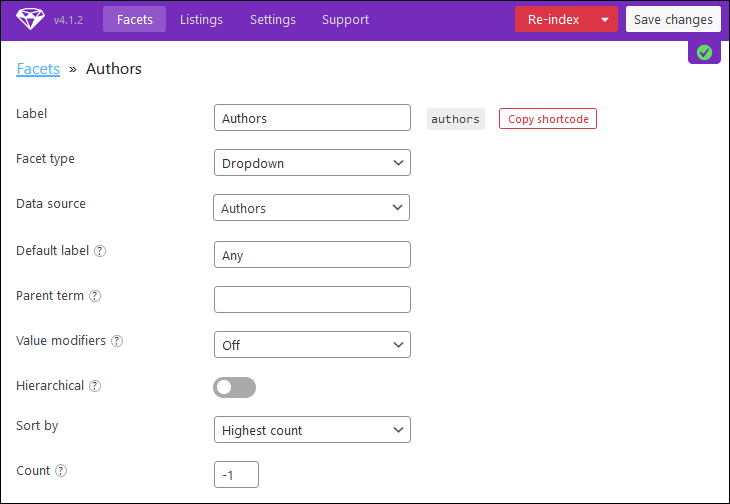
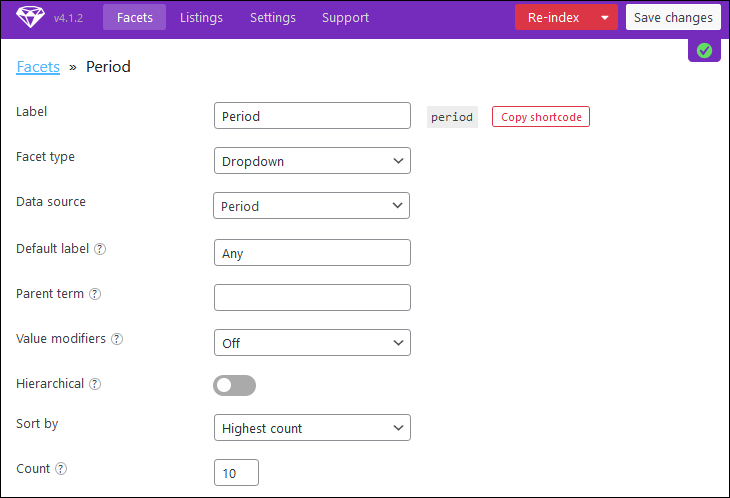
- Click on the blue link Facets or the purple tab Facets to return to your facet list. We’re going to create another facet. This will be for Authors.
- Click on the red button Add new.
- Configure your facet as shown in the image below, remembering to click the button Save changes when you are finished. When you are ready to create the next facet, click on the Facet link to be returned to the list of facets where the Add new button exists.
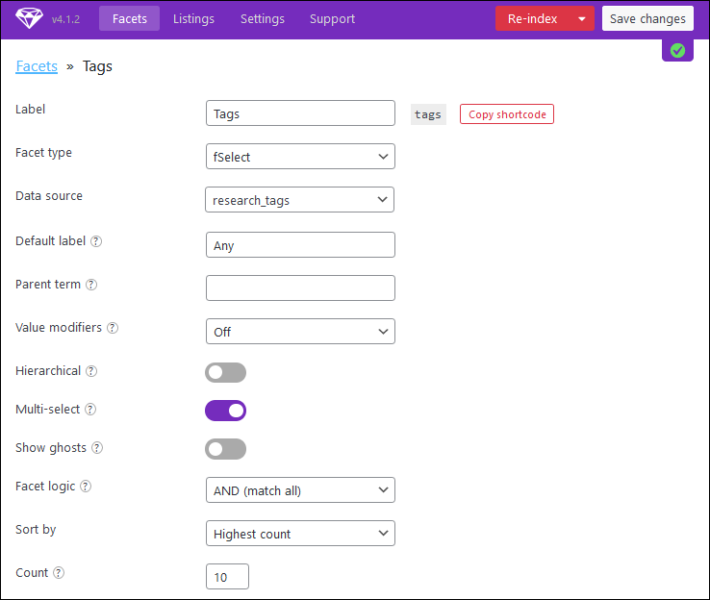
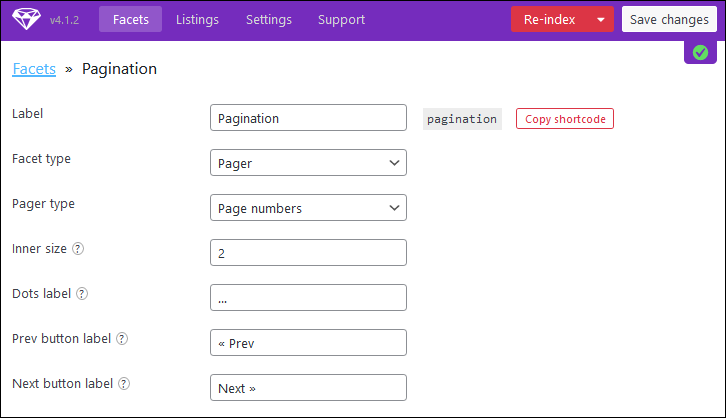
- Create new facets based on the screenshots below.
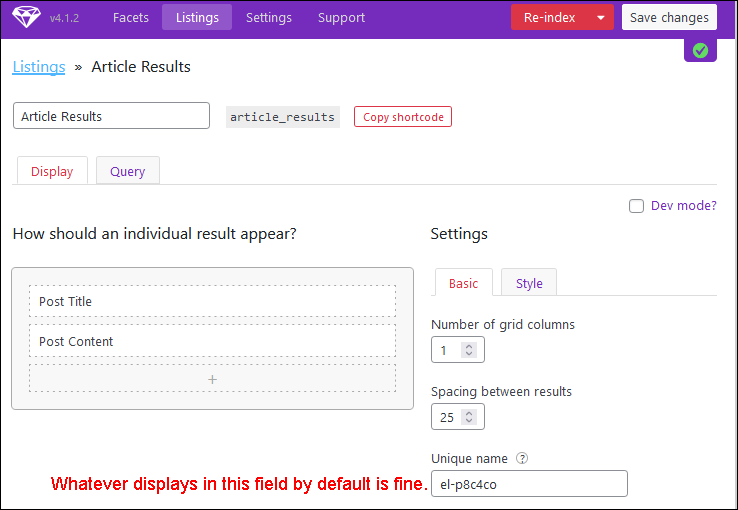
- Now we need to setup the output. Click on the purple button Listings, then click Add new.
- There are two tabs to configure; Display and Query. Configure each according to the screenshots below. Make sure to click on Save changes before switching tabs.
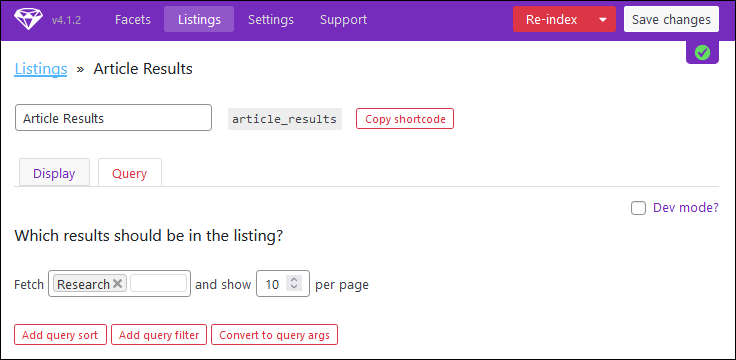
When you’re finished, click the button Save changes, then the red button Re-index. You need to re-index anytime you make a change in this area.
Create The Document Listing Page
This is the page that will display all the articles on it. Create a new WordPress page called My Research Archive, or whatever suits you. Just don’t call it Research. If you do call it research it can sometimes cause problems with the Custom Post Type of the same name.
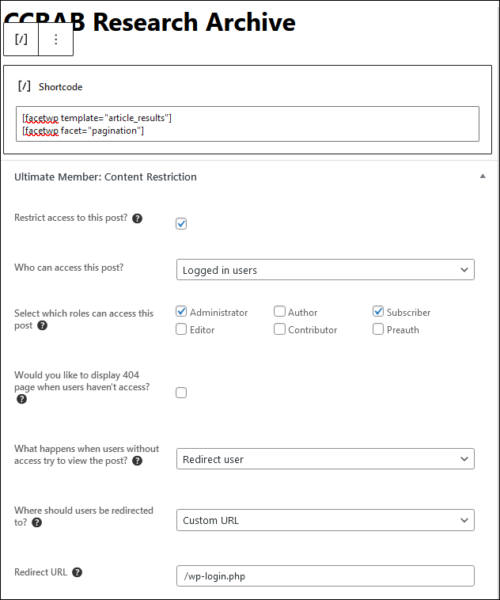
- Place the following shortcode on the page:
[facetwp template="article_results"]
[facetwp facet="pagination"]- At the bottom of the page, set the Ultimate Member: Content Restriction section as in the screenshot below. This obviously assumes a simple use case of only Subscriber members.
Step 4: Create The Search UI
Creating the search user interface is next. In this case I’m assuming a simple WordPress theme is in use, and that the Research listing page has a right sidebar, or some other sidebar, where we can place the facets using widgets. We only want the facets to appear on our member-protected Research listing page. To do this, we’ll need to install Jetpack; unless you are using a theming system that provides conditional display of items, such as is the case with BeaverBuilder. But here, we’re just going to assume a very basic theme is being used.
- Install JetPack. This plugin has a feature we need for conditional display of widgets. Once you install JetPack it might want to walk you through the installation of a lot of features. You can ignore all of it.
- After it is installed, go to Jetpack…Settings.
- From the on-page menu, select Writing.
- Scroll down until you find the section called Widgets. Switch on Enable widget visibility controls to display widgets only on particular posts or pages.
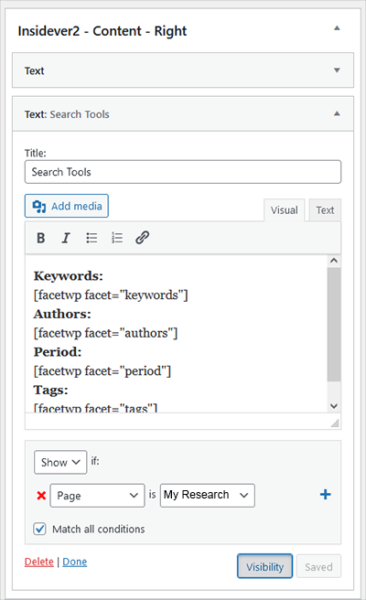
- We’re ready to place our facets using a Text widget. From the Admin dashboard menu select Appearance…Widgets.
- Find the correct sidebar for your widgets and begin by adding a Text widget. Give it a title of “Search Tools” or whatever you like.
- Place the following text into the widget:
Keywords:
[facetwp facet=”keywords”]
Authors:
[facetwp facet=”authors”]
Period:
[facetwp facet=”period”]
Tags:
[facetwp facet=”tags”]
NOTE: You can copy the shortcodes for any facet or listing using the red button Copy shortcode that appears in its editor.
- Resetting the filters is really just a page refresh. We’re going to add another Text widget above our Search Tools Text widget. Don’t give the widget a title, and place the following in it:
<div id="resettingfilter">
<a href="/your-page-name" class="resetfiltermj">Reset Filter</a>
</div>- In your stylesheet place the following:
#resettingfilter
{
float:left;
position:relative;
padding:0;
margin-top:0px;
}

a.resetfiltermj
{
display:block;
text-align:center;
text-decoration:none;
margin-left:0px;
margin-top:5px;
color:#fff;
background-color:#555555;
width:176px;
padding:0.5em 0em;
}

a:hover.resetfiltermj
{
background-color: #3279BB;

}- We need to restrict display of both Text widgets to just the Research listing page. To do this, click on the Visibility button that appears next to the Save button for the widget.
The logic you want is> Show if: Page is (Your Page Name). Checked: Match all conditions.
Here’s what you should have so far:
The finished page should look similar to below, understanding that your styling will probably be different.